THE PROJECT
It has been a crazy couple of months for me personally and I haven’t had as much time as usually to do fun, cool stuff on my Commodore 64. I was going through a difficult time and needed a distraction. I had seen an old video of an Atari computer game called Star Raiders that I used to love playing at my friend’s house as a teenager. I spent a lot of time playing that game and remember being amazed at the visuals back then. I found an Atari 800 emulator and the ROM for Star Raiders and had a lot of fun with it. I think it’s an amazing game, especially considering it was released in 1979.
After playing with the game for a few days, I started playing with the BASIC ROM. I vaguely remembered some of the commands and knocked out a few simple programs. Atari BASIC is certainly a bit different than Commodore BASIC V2. One thing that Atari BASIC had was graphic commands and I remembered as a kid being jealous of how easy my friend had it when it came to making and displaying bitmap graphics on his computer. When I played with the emulator recently, it made me want to build something simple to allow the C64 to have the same ability.
I know what you’re thinking, we have Simons’ BASIC. Which we do. It does a whole lot more than some simple command and changes a lot of the feel of the C64 that I am nostalgic for. Also, as a kid, I didn’t have access to Simon’s BASIC and a lot of downloadable programs relied on it so they were not accessible to me. I wanted to make something that would be useful for the vanilla C64 users, like myself. Something that I could load up, write a program, and include the graphic utility so that others with vanilla systems could also use.
So here is my criteria for writing this graphic utility.
- It needed to be loadable by the BASIC program that would use it (no multi-step process for end user)
- It needed to be able to be compiled (even if the coding was slightly different)
- It needed to be just some basic graphic commands because
- It needed to not intrude on the 38911 BASIC Bytes free of the stock 64
- It would only do HiRes graphics, but able to change color cells to give you access to all combinations of color
- It needed to be able to clear the screen, change colors, plot points, draw lines, remove points and lines easily
- It needed to have a simple way to communicate X and Y coordinates to the ML program
- Bonus items would be added flood fill, check the status of a pixel, and drawing characters on the HiRes screen.
The Product
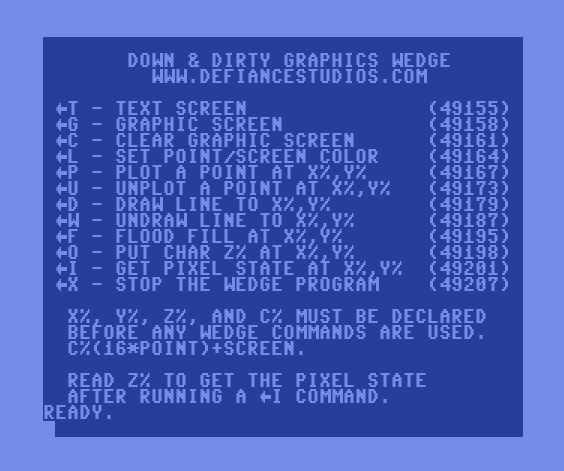
What I eventually came up with is the Down & Dirty Graphics Wedge. It’s not necessarily pretty, but it gets the job done and does it only using 3k of program space starting at 49152. Once you LOAD”HIRES.PRG”,8,1 and start it with a SYS49152 statement, BASIC looks pretty much the same. The difference is that a wedge has been inserted into the C64’s control vector that executes BASIC program tokens. This vector is located at $308 – $309. The program grabs the location stored there and stores it in a new location. It then changes the vector to point to the new code for the wedge which checks to see if the command is one of the graphic commands added. If it is, it executes the new graphics command and then returns to the C64 vector. If not, control is simply given back to the C64 vector.
To keep it simple a single character was used to initiate the wedge. I decided on the left arrow because it isn’t reserved for anything else that I am aware of. Once the left arrow is discovered, the routine then looks to the next character to see what the command is. All of the Down & Dirty graphic command are two characters, the left arrow and a single letter. This way, it keeps the interruption to normal operation of BASIC to a minimum unless a graphic command is initiated. The only command that isn’t two characters is just the left arrow by itself which will bring up a handy help screen of commands. I have discovered when using cartridges like Final Cartridge II, or Epyx Fastload, you need to put a colon before the left arrow in direct mode. It is not necessary in programs. I’m sure this has something to do with the fact that those cartridges are also doing similar things to vectors and causes my code to be skipped in direct mode. Also, the left arrow in Fastload is used for saving a program to disk.
Using the left arrow wedge is great for easy programming but will not allow you to compile the code. So to make the code compatible with compilers, I’ve included a lookup table for all the commands in the wedge so you can use SYS statements in place of the wedge commands. When you call up the help screen with the left arrow, the SYS addresses are to the right of each command.
Passing data to and from the wedge is done via integer variables. There are 4 integer variable that are reserved for the program. They are:
- X% – X coordinate (0 – 319)
- Y% – Y coordinate (0 – 199)
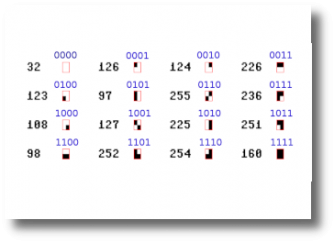
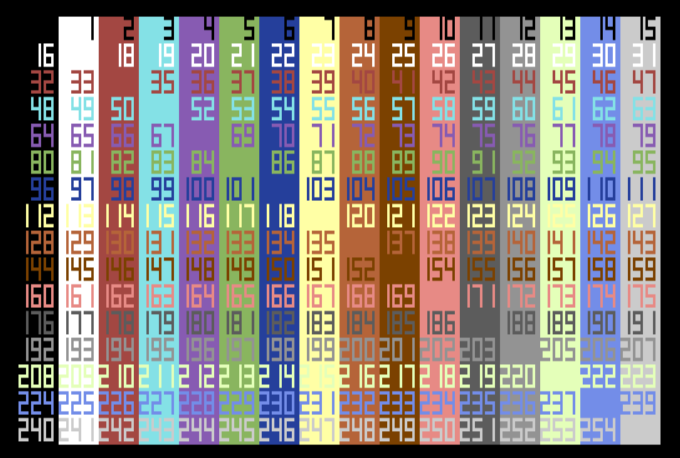
- C% – Color Value for background and pixel of the color cell being written to. The formula is sixteen multiplied by the pixel color (0 – 15) plus screen color (0 – 15). (see color table)
- Z% – State or a pixel (0 for off, >0 for on) when requested or the Screen character value for putting a character on the screen
These four variables need to be set in BASIC before you run any of the graphics commands. The wedge seeks out these variable when a command is sent and if it can’t find them, an illegal quantity error will result. It is recommended that these variables are some of the first created in your BASIC program so that they are the first listed in memory and will be found quickly.
Finally, running one of the graphic commands is done by using a single letter command after the left arrow key. Before you run a command, you would set your variables first. To plot a point, you would enter the coordinates in X% and Y% first, then run the P command.
The commands are:
T – Text Screen. (SYS49155) This is the normal screen on the C64. This command is used for change from the graphics screen to the text screen. Since the two screen are stored in different parts of memory, you can write to the text screen as normal while the graphics screen is active and switch over. Likewise anything you had the text screen will still be there when you go to a graphics screen and come back to it.
G – Graphic Screen. (SYS49158) This is the hires screen command. This command only turns the graphic screen on. It does not set color, or clear the screen. This allows you to create images on the screen while in text mode and switch over to the graphic screen to a fully formed image if desired. The screen uses memory starting at $E000 which is usually unused RAM under the Kernal.
C – Clear Graphic Screen. (SYS49161) This command clears the graphic screen. When initially starting to use a graphic screen, it is recommended to use this command first. Otherwise you could get a flash of whatever was on the graphics screen before the clear screen could clear it.
L – Set Screen and Pixel Color. (SYS49164) This command sets the color of the entire bitmap. This command should also be used before the initial run of the graphics command to clear out any weird color cell colors that may be set. Color memory start location is at $CC00 and takes up the last 1k of memory of the 4k block starting at $C000 (49152). To set a screen/pixel color, C% must be set first.
P – Plot a Point. (SYS49167) This command will plot a single point. First X% and Y% need to have their coordinates set. Optionally, you can set C% before this command if you want to change the color of the point or background of the point you are plotting.
U – Unplot a Point. (SYS49173) As the command says, this will remove a point that’s on the screen. X% and Y% need to be set first.
D – DrawTo. (SYS49179) DrawTo will draw a point from the last plotted point (or end point of the last line) to new coordinates as defined by X% and Y%. C% can also be set if you want to have a different color for the line and/or underlying color cell. The computer remembers the last thing that was done and saves that point. It can be a plot, unplot, drawto, or undrawto command that created the previous point.
W – UnDrawTo. (SYS49187) This will undraw a line from the previous point to the coordinates in X%, Y%.
F – Flood Fill. (SYS49195) This will flood fill any enclosed area. X%, Y% will mark the starting point of the fill. The command will look to C% for any color information. The stack for flood fill is located in unused RAM under the BASIC ROM at $A000.
O – Output Character. (SYS49198) This command will output a Commodore character to the graphic screen. It uses screen poke codes for the character and will place the character completely within the color cell matrix of the screen. X%, Y% will round off to the nearest multiple of 8 to place the character. The character value is passed to the program using the Z% variable.
I – Pixel Info (get pixel state). (SYS49201) This command does an inquiry of the coordinates at X%, Y%. A value is returned to Z%. If Z = 0 then the pixel is off. If Z% > 0 then the pixel is on.
X – Exit Wedge. (SYS49207) This command resets the BASIC token vector back to what it was before the wedge was started. The left arrow key will no longer initiate graphic commands. The program still resides in memory, using the SYS codes will still run the commands, and running a SYS49152 will restart the wedge.
The basic structure of a program when using the wedge is to first check to see if the wedge is loaded. I do this with a check of memory location 49152. This is followed with an SYS statement to start the wedge and a definition of the four variables needed to run the wedge.
100 REM START WEDGE PROGRAM
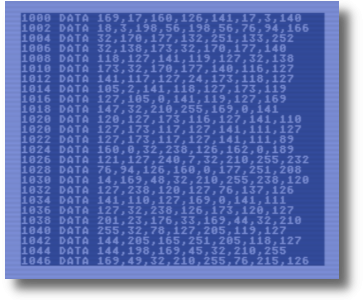
110 IF PEEK(49152) <> 76 THEN PRINT"LOADING ML":LOAD"HIRES.PRG",8,1
120 SYS 49152
130 X%=0:Y%=0:C%=0:Z%=0
140 REM WEDGE IS READY TO USE
After that, the wedge commands are ready to use. A typical command set to turn on, clear, and set the color of a graphic screen looks like this:
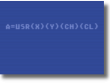
150 C%=16:←L:←C:←G
Setting C% to 16 creates a black screen with white pixels. The L command will set the screen color, the C command will clear the screen, and the G command will turn on the bitmap graphic screen.
To plot a point center, the command will look like this:
160 X%=160:Y%=100:←P
Drawing a line requires you to plot the first point, then draw to the next point. For example, if you were to draw an X across the entire screen, your commands would look like this:
170 X%=0:Y%=0:←P:X%=319:Y%=199:←D
180 X%=0:Y%=199:←P:X%=319:Y%=0:←D
You should feel free to play around with the program and other commands to get a feel for the graphic wedge. A ←T will bring you back to the text screen, as well as a RUN/STOP + RESTORE would.
As mentioned, this program is not compiler compliant. To make it work for a compiler, you need to change all the wedge commands to SYS statements. The small program pieced together would look like this:
100 REM START WEDGE PROGRAM
110 IF PEEK(49152) <> 76 THEN PRINT"LOADING ML":LOAD"HIRES.PRG",8,1
120 GG=49158:CC=49161:LL=49164:PP=49167:DD=49179
130 X%=0:Y%=0:C%=0:Z%=0
140 REM WEDGE IS READY TO USE
150 C%=16:SYSLL:SYSCC:SYSGG
160 X%=160:Y%=100:SYSPP
170 X%=0:Y%=0:SYSPP:X%=319:Y%=199:SYSDD
180 X%=0:Y%=199:SYSPP:X%=319:Y%=0:SYSDD
A few things to note about the program. First is that there is no SYS49152 statement. This is because we are not using the wedge and all the SYS49152 statement does is insert the wedge into BASIC. You can use it if you want, but it is not necessary. The second thing is that I used variables to describe the graphic functions. I just find it easier to work with when I’m basically keeping the same lexicon for the commands.
WRAP UP
Writing this wedge I learned quite a few things. Some about breaking into BASIC, others about line drawing and flood filling. To draw lines, I used the Bresenhan Line Algorithm. What’s great about the algorithm is that it calculates the points to draw the line with simple integer arithmetic. You can see it utilized in my program starting at line 473 in the assembly code. The DrawTo command starts at line 437. While the program is not terribly well documents overall, the Bresenham Algorithm is commented with what is going on.
As far as setting the wedge and reading the commands, that can be seen early in the program. Setting the wedge starts at line 63 and reading the wedge commands start at line 87. I learned how to install a BASIC wedge reading Machine Language for Commodore Machines by Jim Butterfield. Here’s a link to the page that talks about it.
Overall, this was a great, fun project to do. I plan to use this wedge for other articles I’m thinking about in the future. I hope it’s something you might find useful for whatever projects you have.